ladies at autoexpo

CHECK ALL THE BEAUTIES AT AUTO EXPO WITH THEIR CARS AND CHECK ALL ENTERTAINMENT NEWS .

FACEBOOK TRICK UPSIDE DOWN

ENJOY FACEBOOK TRICKS AND TIPS AND UPDATES PROVIDED AND ALMOST EVERY TRICKS AND TIPS UPDATING DAILY .

OLD AND NEW SONGS DOWNLOADS

DOWNLOAD ALL TELUGU SONGS NEW SONGS AND OLD SONGS ,ALL UPDATED ,ARRANGED IN SYMBOL-WISE SEARCH .

DOWNLOAD BEAUTIFUL WALLPAPERS

DOWNLOAD ALL KINDS OF WALLPAPERS LIKE CARS , ACTRESS , ABSTRACT , AND ALMOST ALL KINDS ... .

celebrities caught

ENJOY THE CONTENT PROVIDED FOR REGULAR VIEWERS FOR MY WEBSITE , DAILY REFRESHED CONTENT .

Sunday 30 October 2011

Untitled

www.allinonestudentscorner.blogspot.com
A site for downloads , entertainment , games , technology ,news around the world ,songs downloads , learning resources like english ,photoshop,hacking ,wallpapers ,screen savers,S .OFTWARES ,HEALTH TIPS..............and much more IF U LIKE SITE PLZ JOIN MY SITE........THANKS

Friday 28 October 2011

Speaking Image


Speaking Image

Speaking Image simply put is a cool site. This is a site where users can add multi-media content to an image such as: markers (for annotating), wiki articles, lines, etc. Also, this is a collaborative site where users can allow others to edit their images.

I highly recommend checking out Speaking Image by clicking here!!!
http://www.speakingimage.org/

Enhanced by Zemanta

Saturday 22 October 2011

Add Smileys In Posts,Status Updates & Comments, Get Free Facebook Skins For New Facebook


There are lots of skins available for old Facebook profile layout and to install those they required only mozilla firefox Browsers. Now here’s a new way to add Free Facebook skins/Themes For New Facebook profile and this works on all three major Web Browsers ie Firefox, Google Chrome and Safari. Yes am talking about Social Plus- an awesome Plugin that allows you to have cool skins/Themes For New Facebook profile too. Already more than 3,00,000 users has installed their Chrome extension. Social+ allows you to add a number of features to Facebook.
Also We’ve all noticed that smileys on Facebook don’t show up in posts, status updates and comments. and many fraud 3rd party websites are Spreading Spam in the name of Smileys. It’s time to get rid of those horrible!! The extension automatically replaces all smiley characters with smiley images. You’ll see Facebook and your friend’s moods through new eyes.
Though Social+ also allows you to add Bold, italic and colored status updates characters, i Recommend not use these features because if your Friend is not using social+ then he/she may see the Status update in the weird format. see the example Below:
Free Facwbook wall Smileys
* ] No harm in using Smileys. :P

-How Do i Add Social+ to my Profile ?

  1. Goto Social Plus Download page, 
  2. http://www.social-plus.net/en/download.php    you will see your the Plugin for your browser will be automatically Hilighted.
  3. Now Download The Plugin and install it.
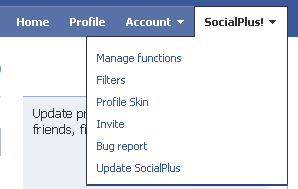
  4. After installation Open your Facebook Profile, you will see another Button Beside the Account Button. Now with this ‘Social Plus’ Button you can Manage all the features offered by Social+.

To Change your Profile Skin Just click “Profile Skin’ and Choose from over 500 Skins/Background


Monday 17 October 2011

airtel-hack-for-free-internet


FIRST METHOD:


1) Connecting Device : Your mobile’s modem
2) ISP Name : anyname (anything you like)
3) Phone Number : *99***3# / Try 99***1
4) Username and Password : blank
5) Configure your browser and download manager to use the proxy
100.1.200.99 and port 8080.( My advice is to use Opera since you
can browse both wap and regular websites)
6) Connect to the dial-up account. You will be connected at 115.2
kbps (but remember, that is a bad joke).
7) Pick up your mobile and try to access any site. You will get “Access
Denied…”(except for Airtel Live!). IT DOES NOT MATTER.
Keep the mobile down.
8 ) On the PC ( or Laptop) open your browser, enter any address ,
press ENTER and…….WAIT
9) After a few seconds the page will start to load and you have the
Whole Internet at your Disposal.

SECOND METHOD:
First Go to settings menu then to connectivity tab now choose the option Data comm. then "DATA ACCOUNTS" go to new account now the settings r as follows
ACCOUNT TYPE:GPRS
NEW ACCOUNT NAME:A1
APN:airtelfun.com
User name: (blank)
Password: (blank)
Now save it
NOW!
Go to Internet Setting in connectivity here choose intrnet profile--go to new profile setting are As below
NAME:A1
CONNECT USING:A1(which was created in data comm.)
Save It
Now you would be able to see it now selest it and take "more" option then select setting here in use proxy option it will be selected no if it is no then change it into yes
Now Go to Proxy address and give the adress as
100.1.200.99 and then the port number as 8080
User name:
Password:
Now save all the settings You made . Come back 2 connectivity
choose streaming settings now in connect using option choose a1 that we created leave the use Proxy option as no itself.


These Are The Settings :


Now access airtellive! from ur activated SE phone goto VIDEO GALLERY OR VIDEO UNLIMITED(varies according to states) choose live streaming then choose CNBC OR AAJTAK WHILE CONNECTING TO MEDIA SERVER cancel AFTER 9 or 10 sec then type any web adress if it shows access denied then once again select CNBC and wait for a few more sec than before if its fully connected also no prob its free then cancel it or if ur connected then stop it and the internet is ready to take of .

GOOD LUCK SE AIRTEL USERS

Thursday 13 October 2011

Sites To Send Anonymous SMS Without Registration


There are a lot of websites on the Internet that provides free sms services but only handful of them allows you to send Sms without registration and anonymously. In this post I will review the services of 4 sms websites that allows you to send Anonymous messages.

1. Smsti.in

Smsti.in allows you send message of complete 160 words and without any ads. There message service is very fast and you can even check the delivery reports of the sms that has been sent.

They provide their sms services for Indian Mobile numbers only.

2. Seasms.com

Seasms allows you to send messages all over the world. This is the only free sms service that I 

found which all allows you to send worldwide messages anonymously.


They also provide 160 character support for SMS.


3. Spicesms.com


Spicesms allows you to send sms only in India with 130 character support for sms. Their service is very fast and sms are delivered instantaneously.


4. Bollywoodmotion


Bollywoodmotion is one of the best sms website as you can send sms up to 500 characters long.


They do not include any ads into your message and messages are delivered in real time.This service is available only for Indian mobile numbers


If you know any other sms services that allows you to send messages without registration then do share with us by commenting.
Related Posts Plugin for WordPress, Blogger...

Wednesday 12 October 2011

Convert Keyboard Into A Disco Light


This is a real funny trick with which you can amuse you friends.It does not require any programming skills on your part.
This trick will make your keyboard LED’s blink like disco lights.This method is based on an a vb script.The blinking of the lights will continue until and unless you stop it.This looks more fascinating in the dark as the keyboard led’s are very small.
OK, Now here is the step by step tutorial with screenshots on how to convert your keyboard into A disco.


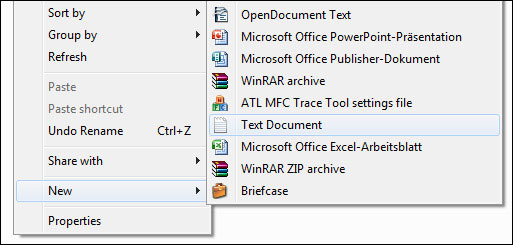
1.Open Notepad.You can open notepad by doing a right click on your desktop and then new-text document.


2.Copy and paste the code below into the notepad

Set wshShell =wscript.CreateObject("WScript.Shell")
do
wscript.sleep 100
wshshell.sendkeys "{CAPSLOCK}"
wshshell.sendkeys "{NUMLOCK}"
wshshell.sendkeys "{SCROLLLOCK}"
loop


3.Save the file with name disco.vbs

4.Double click on the saved file and your keyboard Led’s will start blinking like disco lights.


Note :-

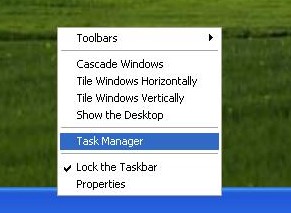
To stop the disco lights open task manager.You can open task manager by doing a right click on your taskbar and then selecting task manager.


Now locate wscript.exe and select it.Click on “ End Process “.


Make Your Windows PC Looks Like Mac


Mac In Windows


Everybody Knows About Mac OS. And Also Want To Use It. So Here Is A Tutorial How To Make Your Windows Xp/7/Vista Look Like Mac Without Any Risk.
It Not Change Full Operating System To Mac, This Is Only Theme And Some Effects That Very Similar To Mac. So Don't Hesitate To Try It. You Can Get Back To Windows Anytime.


Now Follow The All Steps Carefully And See What Happen !

Step 1. Download This File - All Files That We Need Are In The File.
http://www.largeptc.com/MacFiles(MaherHackers.com).zip


=> Now Extract The Files To Anywhere In Your Pc. <=


Step 2 : Open Rocketdock Folder And Install RocketDock-v1.3.5.exe.

After Install Rocketdock Do The Following : 
  1. Copy The Folder Stardocklet To C:\Program Files\RocketDock\Docklets
  2. Copy The Folder Nabs osx leopard To C:\Program Files\RocketDock\Skins
  3. After Copy It To Skin Folder, Open Nabs osx leopard Folder And Copy indicator.png To C:\Program Files\RocketDock\Defaults\DefaultIndicator
Step 3 : Open Replacer.zip From Apps Folder And Extract It To Desktop (Or Anywhere Else). - Little Difficult Part For Newbies !

  • Now Open Replacer.cmd And Go To C:\Windows\system32 And Find uxtheme.dll
  • Drag The uxtheme.dll File From C:\Windows\system32 To Replacer.cmd And Press Enter.
  • Now immediately Go To Apps Folder ( In Extracted Files) And Find uxtheme.dll
  • Drag This uxtheme.dll To Replacer.cmd Again And Press Enter.
  • When Replacer.cmd Ask Y Or N Press Y And Press Enter. It's Done.
Now The Difficult Part Is Over.


Step 4 : Theme Installation - Its Very Easy !

  • Now Open Mac Theme For Windows Folder From Extracted Files.
  • Copy Leopard X.theme And X Folder To C:\WINDOWS\Resources\Themes.
  • Double Click On Leopard X.theme And Click Apply And Then Ok.
Now Your PC Is Changing To Mac But We Need Some Customization To Get It Completely Look Like Mac.

=> Now Go To Desktop And Right Click On Any Empty Space And Go To Arrange Icons By And Uncheck Show Desktop Icons.
If You Not Understand It Click Here To See Image : Uncheck Show Desktop Icons Image

=> Right Click on Taskbar and untick Lock Taskbar and Pull Taskbar to Top of the Screen and Again Right Click on Taskbar and tick Lock Taskbar.

If You Not Understand It Click Here To See Image : Change Taskbar Position Image

=> Now Open Rocketdock, Right Click On It And Set Screen Position To Bottom.
=> Now Right Click On Rocketdock Again And Click On Add Item And Select Stack Doclet And Open It And Change Settings As You Like.

If You Not Understand It Click Here To See Image : Add Item Rocketdock Image


Now You Can Add More Effects By Installing Apps That Provide With Downloaded File In Folder Called 'Apps'
If You Want More Customizations Than Contact Me Via Contact Form.

Its All.If You Had Any Problem Installing Or Customizing It Please Put Your Comments Below And Share This With Friends To Help Us.


=> UPDATE <=


Many Readers Ask About How to Make Exact Windows Buttons (Back,Forward Buttons)Like Above Image.
So Today I'm Going To Give Short Tutorial About It.


Follow This Steps :

1. Download The File MAC STYLER

2.Now, Install Styler1401.msi To Your Computer.

3.Now Just Drag and Drop the "Mac Styler" Folder into "Program Files\Styler\TB\skins\Styler's"

Now Open Installed Program Styler And Go To Toolbar Tab From it.
And Click On Styler's. You Will See Mac Style Option.Click On It.
View The Image To If You Can Not Understand It.

Increase Your Internet Speed By 20%


Microsoft reserves 20% of your available bandwidth for their own purposes like Windows Updates and interrogating your PC etc

You can get it back :

Click Start then Run and type “gpedit.msc” without quotes. This opens the group policy editor.


Then go to:


–> Local Computer Policy
–> Computer Configuration
–> Administrative Templates
–> Network
–> QOS Packet Scheduler
–> Limit Reservable Bandwidth.
Double click on Limit Reservable bandwidth.

It will say it is not configured, but the truth is under the ‘Explain’ tab i.e.” By default, the Packet Scheduler limits the system to 20 percent of the bandwidth of a connection, but you can use this setting to override the default.”

So the trick is to ENABLE Reservable bandwidth, then set it to ZERO. This will allow the system to reserve nothing, rather than the default 20%.
It works on Win XP, Win 7 and as well as Win 2000.
Related Posts Plugin for WordPress, Blogger...

Twitter Delicious Facebook Digg Stumbleupon Favorites More